Ok I am super excited about this project... a week or so ago the ol' husband mentioned that I should re-decorate one of our main walls in the front room... yes this was my husbands suggestion... which is funny cause he goes right along with whatever it is I choose to do with the house... but apparently he was ready for a change...so I of course jumped at the chance and got to thinking about what I wanted to do... so I decided I wanted to put up a shelf... I also knew I wanted it pretty much the whole length of my wall,and of course, I'm on a budget and could not just throw down $100 or more, for a new one... So in order to get what I wanted, spending the $amount$ I wanted, i knew I would have to make it... however, I do not have a handy - man husband, love ya babe, but our tools our limited to such projects...BUUUUT I just so happen to know a handy man, my super-duper awesome brother in law!!! ,,,who DOES have the tools for such a project... luckily he was up for the task and we went to work! We went and picked out the 'lumber' and got going... my fabulous, fabulous {brother in law} does really nice work, is priiitty talented and was even great to 'pause and pose' for all my picture taking along the way!!! So I'm going to walk you through my fabulous new shelf!!! I first picked out a 1x6x7 piece of wood for the main shelf part... {Matt} cut it to measure 4 feet 9 inches long just the right length for my wall!!!
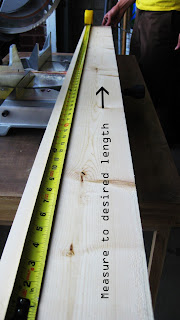 |
| I also bought one piece of 'casing' 3" x 7'... so he measured and cut the 1x6x6 piece to make it 1x6x4.9 then cut the casing to one piece 3x4.9 and two pieces 3x6 the casing was all cut with 45 degree angles... |
 |
| as you can see below these are the main parts to the shelf... the two small pieces go on the side... only 1 side is cut to a 45 angle the other side is straight... |
 |
| Once its cut to length, nail it on... if you don't have a nail gun, a regular hammer and finishing nails works just as great too!!! Nail the front piece on, then the side pieces... the basic part of your shelf is done!!! |
 |
| Now for supports/{brackets}... You can buy supports,,, I chose not to, because I didn't like my choices and Matt said he had some scrap pieces laying around that he thought we could work with.. so we picked out these two big chunky blocks... I think they measured 10x31/2x31/2?... |
 |
| Matt measured half way down the block length wise and width wise drew a line at an angle and took of a chunk of it... |
 |
| They looked like this after they were cut and sanded... Next step was to measure where we wanted them and then we screwed them onto the main part of the shelf... |
 |
| ...drilled three holes and added three screws.... to hold both 'brackets' in place... Then we filled in the nail 'holes' with some good ol' wood putty, waited for it to dry, sanded the whole thing.... |
 |
| .... then painted it black... |
 |
| These are the type of brackets we used... they even come with their own level!!! Super cool!! You screw in one piece of the bracket to the shelf... and the other to the wall, then just slip each one together, {we also used dry wall screws} Super easy and sturdy... well I can say super easy I literally just watched the whole process... |
 |
| drum roll.... yeahhh putting the shelf up!!! |
 |
| SO BEFORE!!!!! |
 |
and AFTER!!!!
!!! I LOVE it!!!! IT looks so fantastic, I keep looking at it!!, I literally just grabbed some things around the house and threw em up on the shelf... I spent $31.16 wooo hoo! Steal of a deal!!! and I seriously love it so much!!! I should try and take more picts cause this doesn't do it justice!! Ok so this really is simple... IF you know what your doing ha ha... anyone who has ever made something out of wood or knows there way around a saw and a 2x4 would have no problem doing this.. if your not 'bob the builder' yourself, chances are you know someone who is, who could help you!!! Utilize those around you, I LOVE Maaaattt he is my new favorite person!!! Thanks so much for all your help and for making such a beautiful piece!!!! |


No comments:
Post a Comment